I’m recently home from a wonderful and relaxing getaway to Ontario (yay to a bit of travel!!) where Cam and I spent time with family and friends. Part of our trip was a week at the White family cottage on Big Rideau Lake where I planned to do some pastelling en plein air. I hadn’t done on-location painting in quite a while so I was feeling a bit rusty. So before I started, I decided to embrace the idea of imperfection in plein air painting to give myself some leeway and also permission to focus on the doing rather than the outcome.
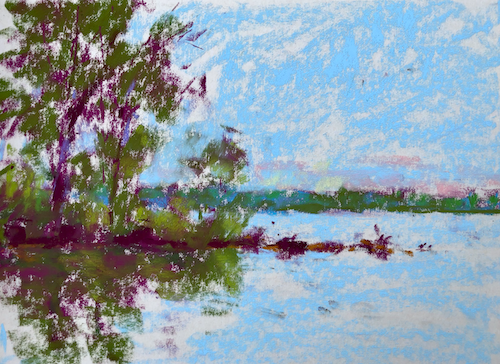
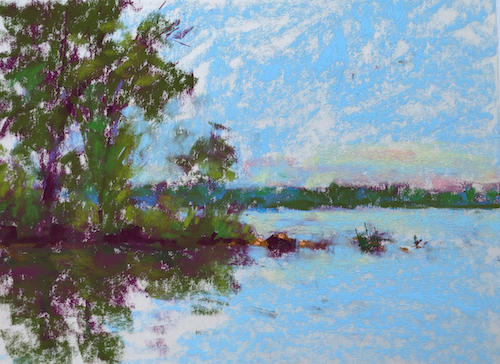
Good thing as my first two pieces were…well let’s just say I was happy that I’d let go of outcome and accepted the idea of imperfection in plein air painting!! I was, however, pretty content with my third (and last piece).
I went for something simple. Or so I thought. Nothing is simple when it comes to plein air painting!
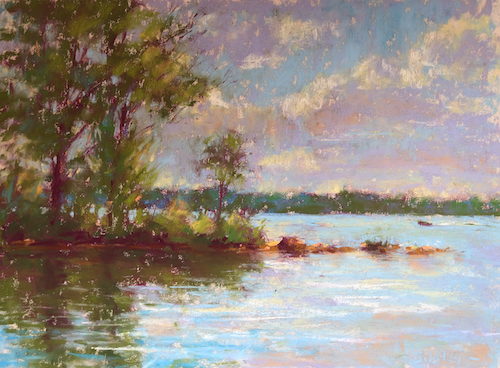
Let me take you on a journey through the creation of that piece….
Here’s a photo of the scene I was looking at – Brown’s Island just offshore. I decided, like I said, to keep it simple. I did this by zeroing in on the right side of the island. I liked the pattern the trees and the rocks made. I was excited to get going!
Before I got started though, I played around with some thumbnails to establish the value pattern and the composition. I did a sketch and then tried different compositional formats with value pattern.
Once I chose the thumbnail to use, it was onto the pastel paper! I carry a pad of UART 400 paper with me on short trips like this. Each piece of paper comes with its own sheet of glassine which is so handy!!
As I began working, I realised there was an awful lot of light area (water and sky) and began to wonder what I’d let myself in for! What was I going to do with it all? But I just kept working.
I began working up the trees and thought gosh there’s a lot of green to deal with. All the things we can really begin to notice as we start working!
Finally, I face up to working on the clouds. Working with my Unison Colour set (available September 2021!), I had to wonder why in the world there weren’t any greyed pastels in it. Hah hah. Right, I needed to stick with my mantra and my own advice: make the greys from mixing the available colours.
Then I moved on to the water as well as giving more attention to the trees and clouds. I also decided to add a boat as every now and again, one would motor by.
And this is pretty much where I got to while working en plein air:
Here are the Unison Colour pastels I used:
All the time I was working, I was sitting in the shade of the cottage porch so all the images above have a bit of a blue cast.
Back home, I opened up the piece to have a look at it. The grass clump on one of the rocks seemed to fight for attention with the boat. Hmmmm. In fact, my Mum asked, “What’s that?” when I showed the painting to her. So it had to go.
Here’s a photo of the untouched piece back home taken in bright overcast conditions. Quite a bit different in temperature!!
I was hesitant to get started as I knew a common tendency is to overdo the tweaking on a plein air piece once back in the studio. (Raise your hand if you relate!🙋♀️) Certainly, I have that inclination!! So, I dealt with the clump of grass. And then stepped back.
One more thing I decided to work on: I felt the horizon was on a bit of a slant and it was beginning to bug me. So I straightened it slightly and didn’t spend time being exact about it.
I can see other “problems” but I’m not going to worry about them. They are things I’m seeing that may not worry anyone else. It’s time to move on to something else!
Here’s the final painting:
And for the heck of it, let’s have a look at it in black and white and compare it to my thumbnail.
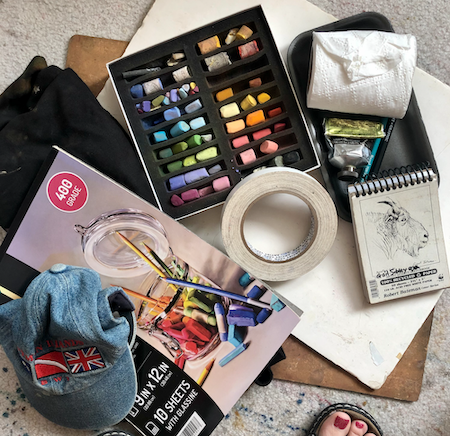
And for fun, here’s a photo of the supplies I took. We went with hand luggage only so I needed to fit my boards in a shoulder bag while everything else was squished into my hand luggage. Travelling light also meant no easel!
You’ll see in the photo above:
- My Unison Colour pastels, broken into small pieces and placed in a small box (by a different brand!) with a piece of charcoal
- A pad of UART paper complete with glassine sheets
- Two pencils (for thumbnails) and a tiny sketchbook
- Black meat tray to corral the pastels I use in the piece
- A board and tape
- A piece of foam core the same size as my board on which to tape finished pieces (covered with a sheet of glassine)
- Body shop Hemp hand cream to make clean up easier
- Small roll of toilet paper to clean pastels as I work and after the session (I didn’t take this because it takes up space and I was sure I could get it at my destination!)
- Apron – worth the space as it keeps me clean and has pockets to hold TP, viewfinder, and choc bar etc.
- Cap – always a good idea to keep sun and/or bright skies out of your eyes
- Missing from the picture (because it was old and dried up!) is a travel size package of WetOnes for after-painting cleanup
And that’s it!
I put the two boards and pad of paper together in a plastic bag and carried that in the shoulder bag (along with anything I wanted to access quickly – eg my purse, a book) and the rest of my supplies went in my suitcase which in this case was hand luggage. If I was checking a bag, I’d keep the pastels and paper with me.

The trick with plein air work is to not fiddle-faddle and fuss with perfecting things when you get home (or on-site for that matter!). This is what I mean about embracing the imperfection in plein air painting. The longer we examine our on-location work, the more imperfections we may see… and wish to fix. The problem is, we can “tidy” things up so much that all the energy and spontaneity that comes through in the plein air piece can be replaced by something that evolves into something stiff and lifeless! Ugh.
So let it be and accept and embrace the imperfections.
The thing with working on location is that it’s an immersive experience that goes far beyond creating an impression of what’s in front of you. It’s a memory-making and learning opportunity! (Click here for an example of a quick and energetic plein air painting!)
And now it’s your turn! Do you work on location? Do you tend to tinker with your piece when you get it home or do you leave it alone? I’d love to hear from you so do please leave a comment 😁
Until next time,
~ Gail


















34 thoughts on “Embracing The Imperfection In Plein Air Painting”
Thanks, Gail. I love the tidy travel pack. How do you set up at a location? Obviously you don’t haul an easel around. Do you sit with pallet on your lap or what????
Thanks for the question Donna! Basically I tape my paper to the board and sit with the board on my lap. Not perfect but I make it work in situations like this. Usually I am on the ground or a rock and have the pastel box beside me.
I paint with a group of plein air folks once a week. They are all seasoned artists, most with university art degrees and some have taught art at the high school level. Not me, but I keep showing up. Sometimes I get a painting completed, often times I don’t. Every once in a while a completed painting is somewhat decent. I think that the most difficult painting location is a garden. They are generally private and small and very closed in, and I find that environment more challenging than broader landscape. I also prefer when there is something architectural to anchor the painting.
I’m looking forward to your Tuscany workshop in 2022. Is there any particular reading or video that would help me prepare?
Thanks for sharing your own experience with plein air Liz. Showing up and painting is always the best thing you can do! I hear you about the broad landscape. When it comes to gardens, sometimes the easiest (?) thing to do is a close up. You can see in this earlier blog how I’ve done this. (You can also see my usual with-easel setup.)
Yay for Tuscany in May 2022!! We’ll have such fun! I don’t have nay specific advice for you at this point. You are learning and doing lots in the IGNITE! membership and that’s a great foundation!!
loved the piece …so free and liked the colors also
Thanks so much Juliet!
Thanks for this….. I have been interested in trying Plein Air and you have made it sound simple and achievable! Going to get outside on a short vacation next week and give it a go…. And I live in Ontario!
That’s so great to hear Rosemary! Remember to embrace imperfection and reward yourself for the doing rather than the outcome. This releases you from any anxiety about the possible result.
Hi Gail, Loved your little plein air piece!!! I have been pasteling awhile (studio only), but starting to do a little plein air out in my backyard flower garden. It’s a bit tricky with lighting, insects etc
and I always have too much with me when setting up. You have made it so easy with your “step by step” technique, and the supplies used. Thank You so much for your great advice, I am now inspired to do more plein air! Always, Best to you, Gayle
Gayle I love that this post has inspired you to do more plein air painting! It can be hard sometimes but you know what? The experience itself is so rewarding!
You can see how I worked in the backyard in this post. You can also see my usual with-easel set up.
Very helpful. I would add a fold up stool. You didn’t indicate when you added orange and yellow, the sunshine. Was it midday? A group of us do plein air weekly in the Ottawa Valley depending on the weather from 10am to noon on Thursdays. Sometimes hiking to the location uses up time as does setting up an easel. Sorting your colors by Value and temperature saves time. Thanks.
Hi Bonnie, thanks for your comment and question.
It was midday with bright overcast and some blue sky peeking through. I’m sorry I didn’t have more progress photos – I get wrapped up into what I’m doing and forget to pick up the camera even though I sometimes remember to set the timer!!
A fold up stool was out of the question for hand luggage. If I could have allowed for that space, I would have taken an easel for sure! Also, I find leaning down from a stool can be harder on my back than catching on a rock or the ground. It really depends on the situation!
You’re certainly right about colours organized by value and temperature saving time! I would normally do this but this is the set I’m in final prep for with Unison Colour and it shows the possible arrangement of pastels for the presentation box.
I have recently started painting en plein air here in Knoxville, TN. I have done the majority of the painting in the field and like you made tweaks (vs. major finishing and changes) in the studio. Because I am largely inexperienced in on location painting, I found my first two paintings came out much, much darker than I thought they would be. Each session produced one painting. Both were done in 45 min to an hour. For my 3rd, I specifically chose high key colors (much higher than I ordinarily would), and that painting came out fairly well in terms of values but struggled in terms of composition. I must say that regardless of end results, painting on location is exhilarating, and the ONLY way I would have attempted it was to promise myself it wouldn’t matter if the paintings weren’t “good”. I am itching to get back out there. Thank you for sharing your experience, Gail.
Alessandra, thanks for sharing your own start to plein air painting. You say it so well when you exclaim that it’s “exhilarating” – the perfect word. It makes one feel ALIVE! Yeah!! Love too that you let go of any expectation of a “good” painting. I know your words will encourage others to give plein air painting a try!
Also, yes, sometimes paintings can turn out too dark if we work in really light conditions. All part of the learning journey!!
Love the final version!! Thanks for sharing your struggles and victories with plein air. I’ve only done plein air a couple of times, and I must admit…. I much prefer being in the studio. I always hear about how plein air contributes so much to one’s art journey, but I don’t get many opportunities to do it. Maybe one day soon…..
Thanks Ruth!
And I hear ya about the struggle to just get out and do it. Yes I do. So how can I help make it happen??
Hi Gail, For me at first, plein air painting was a love/hate thing, but now I am obsessed. I had to learn to consider everything I did en plein air as a study, even if it’s for a plein air contest. This takes off a little of the pressure. When I bring a painting back into the studio, I try not to touch it too much, for fear of losing the freshness that only plein air painting produces. Little things like fixing a horizon line, fixing the yellow of the goldenrod because I didn’t have the right yellow, straightening a window pane with a pastel pencil, etc. I am a very tight painter by nature and plein air painting has been so good for me. Thanks so much for your newsy and helpful articles!
Hey Lori, thanks for sharing your own plein air experience. I know what you mean about the love/hate relationship at first. I find I always have a bit of that when I start painting en plein air after a bit of a hiatus. The thing is then to keep at it!
Love that you think of everything done on location as a study – brilliant mindset to let go of pressure!! Thanks for sharing that. Love that you think that way even for a plein air contest!
And yes, plein air painting is such a great way to get looser. Great encouragement to those wanting to move beyond the tightness of their work.
A lovely fresh piece of work, I wonder what the size was?
Thanks!! (And thank you for your help with seeing the thing that wasn’t working!)
The size is 9 x 12 in but it would probably lose a quarter inch on all sides when framed… so 8 1/2 x 11 in
Oh Gail, that’s so great. I envy. I’d had liked to be with you there.
Yours Alexandra
Alexandra, thank you!! I’d love you to be painting with me too!!
I can really relate to embracing the imperfections. I’ve been participating in plein air competitions , 2 events per year, for a few years now. When I have won a prize of any kind its been for something done in a “quick paint”. No tweaking, 90 minute paintings. I need to learn to leave it alone! Thank you for sharing
Joanne thanks so much for sharing your own rewards for embracing imperfections…so much so that you have won prizes for doing so!! Awesome!!
I tinker and tinker until I manage to overwork everything. I have to listen hard to my don’t tinker side. Oh, and the thumbnails are so helpful. I now do them every time, with good results in value work. I love portrait work over all other forms, and learning to go easy on a face color is getting there!
Mary, I do hear you about tinkering!! Great word to describe what we can get into doing if we aren’t vigilant!
So very glad to hear that you use and see the benefit of doing thumbnails. They DO make a difference don’t they?
And of course all this applies to portrait work (the not-tinkering and the thumbnails). Always good to hear about moving forward 😁
I go out with a group of seasoned plein air artists weekly. This will be fun, I thought, and a great way to safely socialize after a year of isolation. I never dreamed how overwhelming painting out would be! Trying to focus on simple shapes while being presented with, literally, everything under the sun has been a real education. Occasionally I succeed, sometimes I can save a piece back at home, sometimes I’m just thankful to have learned something! After 6 months I’m starting to understand how to rein in my vision. After 6 months I see how I’ve been able to apply my hard won knowledge to my studio work. After 6 months I can’t wait to continue!
Tamara, thank you so much for sharing your story with starting plein air work. It really helps to go out with a group because it does keep you going when initially, you may be having thoughts of quitting given the feelings of overwhelm and all the other things going on with painting on location! So brava for your commitment. And YES! so much payoff!
The overwhelm of seeing the whole world is huge and real. Which is why I recommend using a viewfinder AND doing thumbnails. I think a viewfinder is a must for someone just starting out. And, there’s always one in my bag…just in case. (It’s also got other uses which I detail in this blog post and this one (about using it to help see colour).)
Gail, I love the way you can produce such a colourful and interesting painting with these few pastels and no easel. I bought a plein air easel a couple of years ago, but i have found it a lot of bother to set up. I haven’t done a lot of plein air, usually with the same friend, and found pastel a bit messy-prefer water or gouache sketches. But the best thing is the interactions I’ve had while painting. Last time a bunch of school kids on a camp who had been kayaking came and had a look and admired my painting (although I thought it was awful). I spent the next few minutes telling them about pastels and how doing art is fun and can enhance their lives. That was the day I left my pastels on top of my friend’s car and lost them – I’ve already told that story! Another time a pelican came out of the water and right up to me- slightly unnerving but memorable!
Thanks so much Judi!! And yes, sometimes less is more when it comes to plein air materials. Like anything though, when you use the easel etc over and over, it all becomes easy to set up. Practice makes perfect hah hah.
Thanks for sharing your stories of plein air experiences – that’s so much of what makes it enjoyable! I’d love to have been there with the pelican!
(And yeah ugh, I cringe to think of those pastels….)
Such a useful article, Gail, and I can’t agree more about Plein Air and accepting the imperfections. Owners of a Plein Air pastel of mine had it damaged by water and asked if I could repeat it. I had four attempts and failed miserably to get the feeling of the original which had taken about an hour to complete. I finished up carrying out remedial work to the original but it was nothing like the original done on site on the day. The temptation is always to ‘fiddle’ and that loses the impact.
Ahhh Peter, yes! Such a great story about the vitality that comes with working on location, an energy almost impossible to replicate in studio. I do feel for the owners of your painting and wonder how the damage happened?
Hi Gail, Thanks for permission to travel light! I’ve read several articles, chapters on outdoor painting, and watched some UTube videos on what to take. Lately I’ve been painting about town since I love being in the world rather than indoors. When taking all that is recommended in articles, etc., I can hardly pick up my the large backpack I bought. I’ve had shoulder surgery a couple of times so have to find something to sit the pack on that is at least waist high. I’ve kept saying….I don’t use that…..or that….or this! I’m not done thinning out yet and your small short lists are going to be a real help. Bless you! Jane
Jane, it’s so easy to get caught up in the thought that we need this and that. I’ve decided I can still carry less as I prepare for my UK trip. Ideally, you have a standing easel but I’ve travelled without one (cos it’s probably the heaviest thing I take) and find a place to sit. NOT ideal but really, when you think about the purpose of painting en plein air (grabbing an impression of place and your response to it as well as learning to see colour and value in real life), it does the trick!