Recently I was asked to share how I create greys in my pastel paintings. Rather than write an email in reply, I made a video on painting gorgeous greys in soft pastel as I thought my answer would benefit many pastel artists.
Take a look!
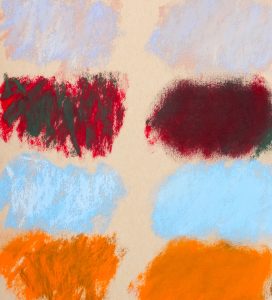
As you can see, I like to layer complementary colours to create vibrant and interesting greys. Why pick up a grey pastel when you have this option?!
Here are the final 50 shades of gorgeous greys:

To make grey, you need the three primary colours – red, blue, and yellow – plus white. Mix all of these together in various amounts and you get greys – hundreds of them! Some will lean to the warm side while others will be cool. You can run through the whole value spectrum from black to the palest of greys. Mixing complementary colours (red/green, blue/orange, purple/yellow) will do the same thing as between them, there’s some combination of the three primaries.
It’s much easier to achieve these gorgeous greys with paint – just squeeze tubes and mix the colours on your palette. In soft pastels, things work a bit differently. Layering takes the place of mixing on the palette and so your grey may not be as perfectly achromatic as when you mix with paints. Still you will end up with a more neutral colour than each stick on its own! And it’s these combinations that make for an infinite variation of vibrant gorgeous greys. I get excited just writing about them!
Here’s a close-up:

Don’t just use this technique for obviously grey subjects like a grey wall or grey clouds. Anytime a colour doesn’t shout out at you like a red stop sign, you are probably looking at some form of grey whether very neutralized ie ‘grey’ or just off the pure colour.
And greys will make your colour accents pop! Just look at the colour swatches above their greyed counterparts.
So instead of reaching for a grey or neutral pastel, why not try layering two complementary colours. Try it out and let me know how your experiments go! I want to hear that you’ve tried creating these gorgeous greys!
~ ~ ~
On another note, you may have noticed I’m now creating Q&A videos. I have a couple more lined up but I’d love to hear your questions. If you have one, arrange a free 15-min call where I’ll try to answer your question. If I feel it will benefit others to hear my answer, I’ll choose it to create a video! So schedule your session now!
I’d love to hear what you think about the video – pushing the authentic envelope for me – eeeeek!
Until next time,
~ Gail












![Pastels on black aper: Gail Sibley, "Untitled [at this point], Mount Vision pastels on Sansfix pastel card, 5 1/2 x 7 3/4 in](https://www.howtopastel.com/wp-content/uploads/2016/04/IMG_9649-2-150x150.jpeg)




36 thoughts on “Gorgeous Greys – Creating At Least 50 Shades!”
I so enjoy listening to your bubbly happy good natured self. I’ve discovered pastels not to long ago. Love them. Thank you so much for sharing.
Thanks so much Valerie. And I’m so glad you’ve joined the rest of us who love pastels!
Love your tip Gail. It’s something that I’ve been learning to do this past year and I find it amazingly freeing. I no longer feel compelled to go out and buy all these “grayed” pastels. It’s much more fun to create my own. And since I think of myself as a colorist, I find that using this technique really lets my colors shine because the “grays” highlight how gorgeous all the other colors are. These grays are alive, and marry with all the other colors I’m using. It’s a wonderful experience watching a painting come to life as you use this technique. Thank you so much for sharing!!!!
I agree Mary – the fun is in the mixing! And yes, greys do highlight all the other colours. So glad you are experimenting and pushing the possibilities!
Great video! This is really helpful. I have a friend who paints with oil and uses black to shade colors. I told her to use the color’s compliment instead of black. I then showed her what I meant and she did not know that adding the compliment can darken the source color nor that if you continue to mix you will get a neutral gray which is in most cases a type of brown or sienna, depending on the colors (with oil or acrylic, anyway). This video shows that shading with compliments yields and much more colorful and rich shade as well as enhances the color harmony of a piece. Well done!
Thanks Curt! Yes, those who paint in oils or acrylics or watercolours really have an amazing opportunity to create beautiful lush greys only with red, yellow, and blue (and some white if needed for lightening). Still we pastellists have a fabulous opportunity too!
Loved your demo of the fifty shades of gray. I too have used just straight grays and they seem to deaden
my painting. Would you say that using grays and adding colors would get the same effect or maybe it’s the idea of the complementary colors that make them so colorful. Anyway I am definitely going to try the complementary color way. So beautiful. Thanks for the tip.
Thanks Janet! There are some beautiful grey sticks of pastels out there and there’s no harm in using them, even as a light scumble over a layer of complementary pastels. But I would say try the colours first and see what happens!
Thanks for the great blog. I can’t add to this, because you just taught me something. So, thank you and thanks for sharing. I love how upbeat you are.
Anne that’s terrific to hear!! Thank you 🙂
Thanks!! Great tip for creating greys. Thanks for all you do!! I learn so much from you and love the FB page, too!
You are so welcome Ruth. Glad you’re having a fun time in the Facebook group too!
Great video Gail! Could you please tell us in which order you decide to layer the complements in order to achieve the greys? Curious about this particularly when using yellows or another lighter value with darker values. Also same question with similar values but differing hues.
Thanks!
Great question Catherine! When I was doing the exercise for this, I randomly chose which colour went down first. Generally when I’m painting, if I want to grey down a colour, I’ll add the complement to it. If the second colour is lighter (or darker) and I want to retain the value of the first colour, I’ll go overtop with the original (first) colour to re-establish the value I want while still holding on to the greying aspect of the second colour. With colours of similar values, I may tend to apply the lighter and/or brighter colour first. But I don’t have a formula I follow. I suggest you try out both versions on a piece of paper to see the effect of each application. Remember, you can always reapply the first colour and then the second again until you achieve the greyness you desire!
Rather a timely article for me, since I’m working on improving the greys I use for shadows in clouds (British skies, by the way). Mine tend to come out a bit too blue or purple at times. Often I see brownish-red coloured greys in the shadows; and at other times, a kind of soft pearly grey. Both are rather elusive to mix. Haven’t watched your video yet so the answers may be there! 🙂
Hey Chris, I think using complements or an opposite temperature may be the answer. I do hope you’ll return and let us know what happens when you try doing this. And yes, I know what you mean about those warm lovely browns and gorgeous greys that appear in clouds often in contrast to purplish ones in the same collection.
Great video. I was just about to order a set of Gireult (spelling??) greys from Dakota Art … I’ve heard they are great neutrals and very useful…??….but recently I’ve been taking some local acrylic and oil classes as well, learning about colour mixing. Presto you offer us a whole table of mixing possibilities done in classic pastel fashion! Thank you so much! Do you make colour charts for other layering possibilities and is that something you recommend especially for beginning pastelists? I’m guessing at this point in your career you choose your layering ideas based on instinct and experience? Would you still recommend the Gireult greys as being useful, however?? Thanks for sharing!!
Can’t wait to get back at it!
-Leslie from Langley
Thanks Leslie! And thanks for your questions. First yes, I definitely encourage anyone, and particularly beginners, to try out as many layering possibilities as they can. In this case it’s all about greys but it could also be about mixing greens, purples or oranges for instance.As to your question regarding Girault greys, I cannot really answer it as I don’t have experience with that set, with any set of greys in fact. Truth be told, I’ve always had a bit of an aversion to greys and it’s only as I mature as a painter that I now recognize the perfection and use of greys. If you’ve already ordered the set, let us know what you think. Otherwise, try out some grey-making and then add grey sticks as needed. There’s nothing like having some cool and warm greys in your collection!
This is amazing, it inspired me to revisit a painting on the wall, i wish i could post pics here but might on FB later. It really brought the picture to life. thanks so much.
Anita I LOVE hearing that!!! Please do post it in the Facebook group!!
Wonderful exercise! Thanks for sharing! and love the presentation 🙂
Thanks Lana! Glad the presentation was up to snuff hah hah!
Brilliant video as always Gail. Love to hear you in real life! Keeping making the world a brighter place for all us happy pastellers! Lynn
Gee whiz thanks Lynn! I did hav fun letting more of ‘me’ out there! The world is a marvellous place isn’t it?
Thanks Gail for the lesson on greys! I saved the chart you made so I can further explore these colors myself. The difference between these greys and a standard stick from a box is so much more interesting .
To blend or not to blend for me will depend on the subject I’m painting those greys in.
I’m thinking about my pastel questions and it would be fun to call with one.
Hi Sandi,
Loved that you would save this chart. Do go ahead and create your own – it’s such a fun and yummy experiment!
Look forward to a pastel question I can create an answer to 🙂
You brightened a “gray” overcast, rainy day with a very fun and informative video. Another variation of your mixing technique is to layer 3 colors (2 warms + 1 cool) or (2 cools + 1 warm) for creating vibrant grays. But as you pointed out in your video, layer instead of blending for maintaining vibrancy. Thank you Gail!
How lovely to know I brightened your day Tracey even if it was with greys 🙂
Thanks for the addition to how to create greys – I hadn’t heard that version before. I’ll be giving it a try!
I liked the explanation and visual examples. I love greys and have several sticks. It is a labor to find the right grey and unfortunately, there are not enough of them. I will be trying to use complimentary colors to achieve that beautiful outcome. Thank you.
That’s great to hear Nancy! I love bright vibrant colour but as time goes on, I have grown to love and appreciate greys. Hope you’ll share some of your grey work with us in the Facebook group 🙂
Great video Gail! This is so timely because in my class tomorrow I was having my students use a black and white photo reference to create a colorful painting. I was going to discuss how to get various values without using black. Your color chart is the perfect demo!
Hey Irene, that’s fantastic! Would love to hear how your class went 🙂
I have done similar color charts and I have found them so helpful. I like the idea of focusing solely on colorful grays. Like the short video format!
Thanks Susan – glad you liked the video! Yes, colour charts can be super helpful. I find though that we all tend to make them while in workshops but don’t make the time to create them on our own at home. Glad to hear you make your own. Now you can add greys to the chart mix 🙂
Thanks for this video! I came across it because I was searching for a way to get some blue greys that I just don’t have in my limited set. (Fairly new to pastel)
Really helpful and the color chart was wonderful.
That’s GREAT to hear Christy! I hope you’ll give it a go!!!