I came across the work of Tim Reilly while I was working as Editor for Pastel Today (I retired in February). His piece Legacy won an Honourable Mention in the PleinAirSalon October 2022 competition. I loved the simplicity of the piece and the way he elevated this ordinary object – a house painting brush – to pedestal status. Along with the way he gives us the sensation of bristle hairs, worn metal, a chipped wooden handle, I was mesmerised by the way he created the feeling of the stone wall behind the brush. How had he done that using soft pastels??
My curiosity led me to ask the artist if he’d be willing to share his secret with HowToPastel readers. And ohhhhh, yay, he said yes!! I’m delighted to introduce you to Tim Reilly!
Before I do that, have a look at his winning painting:

And now, a wee bit about the artist.
Tim Reilly Bio
B.F.A. Pratt Institute, Brooklyn, NY
Classes with Milton Glazer, James McMullan at The School of Visual Arts, New York, NY
Retired Creative Director and Graphic Designer (ABC Television, Instructional Television, Advertising Agencies, Corporate Design Departments)
You can follow Tim Reilly on Instagram and Facebook.

Okay, let’s get on with the show!! Here’s Tim to share his knowledge and art journey with you.
~~~~~
My interest in drawing started at a very early age. I was given several boxes of crayons as a child and wasted no time colouring the animals and parade wagons of the circus-patterned wallpaper which covered the walls of my room.
Upon graduation from Pratt Institute, I began my career in advertising, corporate design, and freelance illustration in New York. Soon after, I purchased a book on working with pastels written by Daniel Greene, PASTEL- A Comprehensive Guide to Pastel Painting. I was hooked! I’ve admired Mr. Greene’s work for many years and learned so much from his collection of DVDs and published books. In addition to his incredible talent, Daniel Greene was a truly articulate, generous, and effective communicator whose contribution to the practice of the pastel medium is immeasurable.
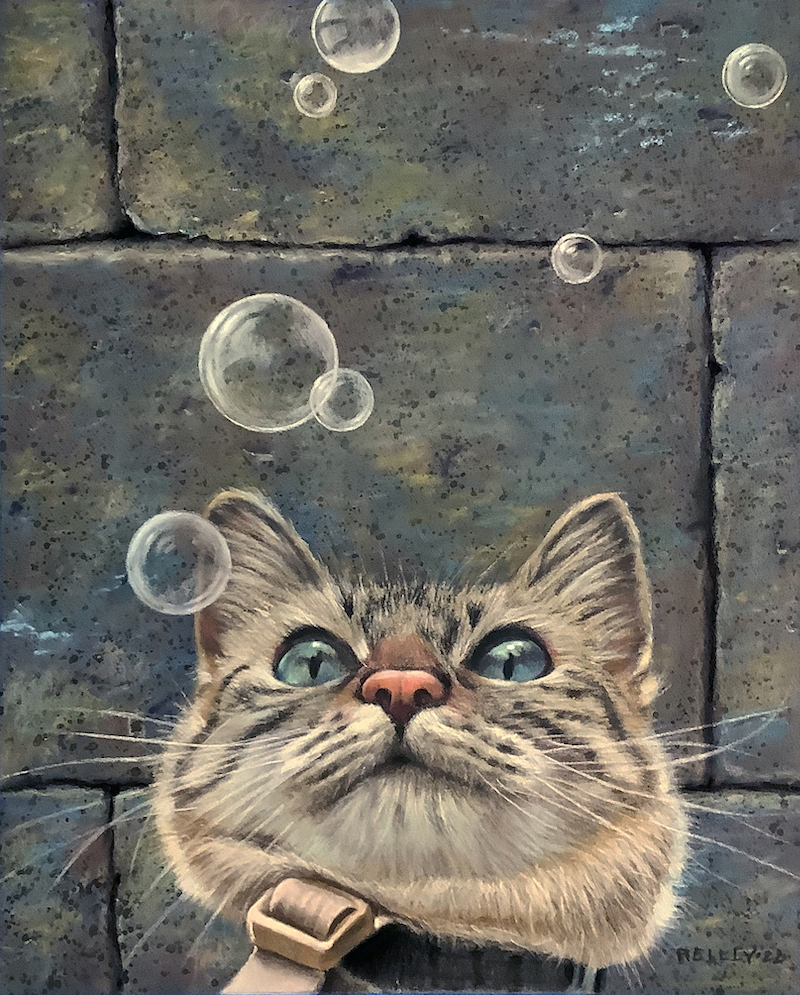
I began reading and researching all I could to learn more about pastel painting techniques from books and articles published on Albert Handell, Harvey Dinnerstein, Joe Singer, Edgar Degas, and illustrators Gary Kelley and Robert Heindel.
Other influences include: Andrew Hemmingway, Claudio Bravo, and Robert Vickrey. I’ve been fascinated by Vickrey’s technique for creating stone textures in egg tempera which I’ve adapted for the pastel medium and use in my own work today.

I employ several types of support for my pastel work. Usually, the choice depends on the image that I intend to create. Pastelmat paper, La Carte and Crescent cold press 310 professional-grade illustration board are among the options available and on hand in studio stock. Although Pastelmat paper accepts wet media, I prefer to use a heavy illustration board when rendering the stone texture seen in my work. I find that the heavy board is suited well to accept the multiple layers of pastel colour spattered on the surface with alcohol, pastel pigment, and bristle brushes.
The process begins by stapling the edges of illustration board, around all sides, to a piece of quarter-inch or eighth-inch plywood. I then scrub a very thin wash of watercolour into the illustration board which raises the tooth of the top layer of board and provides a better surface upon which the layers of pastel are applied. The added watercolour paint ensures that all of the live area to be covered is visible while applying water to the surface. Scrubbing too vigorously will lift the top layer of paper from the board, so care should be taken during this step not to apply too much pressure on the brush.
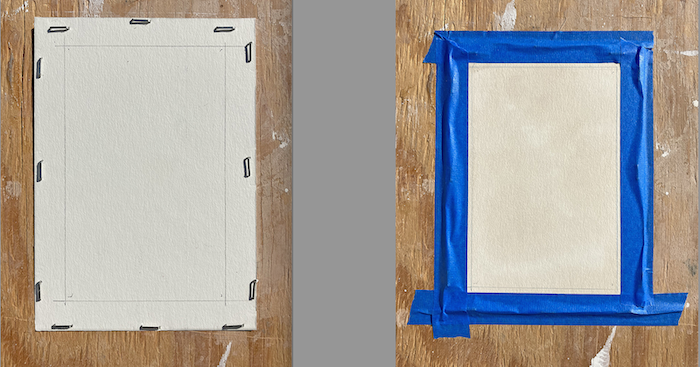
When the wash dries, blue tape marks the boundaries of the live area to be painted adding an extra one-eighth or one-quarter inch to all four borders of the illustration board. This will compensate for any miscalculated overlap of the final picture mat and insures that no uncovered areas remain after framing. The board is now prepared for the initial drawing.
I make regular pilgrimages to the grocery store for produce and to the local Flea Market for interesting items to include in his paintings. After a process of trial and error is complete, an arrangement of chosen objects is set up and photographed under a variety of lighting conditions.
Floral green styrofoam is painted a neutral grey and serves as a platform for the elements to be included in the composition or as a background to represent the areas of stone or concrete in the still life set-up.
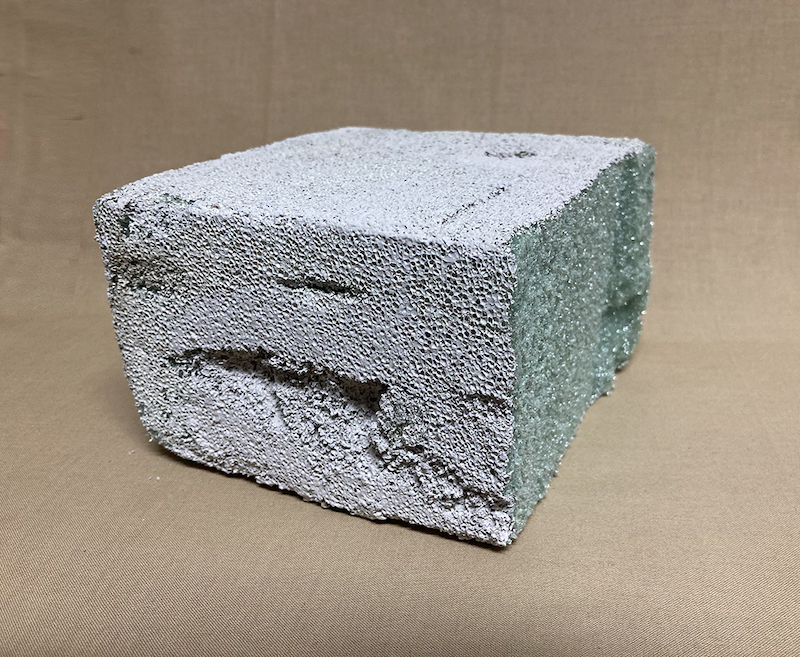
I take dozens of pictures so I have many from which to choose. Often these images are tweaked on the computer to enhance saturation and light and shadows or manipulated in Photoshop to arrive at a pleasing composition. The final reference image is then uploaded to my iPad.
Next, the initial drawing is done on the board with a raw umber or burnt sienna pastel pencil. I work with Derwent, Carbothello, Faber-Castell and pencils from a variety of other manufacturers. Some passages of the composition may be underpainted with acrylic washes or left completely untouched to be covered only with the alcohol pastel mixture.
Sections of the piece not intended to show texture are masked off with tracing paper, vellum, newsprint or liquid frisket. Liquitex offers a rubbery product called liquid masking fluid which is used to cover the more detailed or intricate areas of the drawing which may be too difficult to cut around or cover with masking tape or paper.
My “workhorse” pastel brands are from Rembrandt and Nupastel sets. I subscribe to the procedure of working softer sticks over harder ones, working dark areas to light. Other pastel sets and individual sticks supplement these which make colours available that are not present in the two sets I use most frequently. Diane Townsend sticks are great for the sandpaper grinding process because of their size and shape. Also, Townsend offers colours in the darkest of values which can’t be found in many other brands.
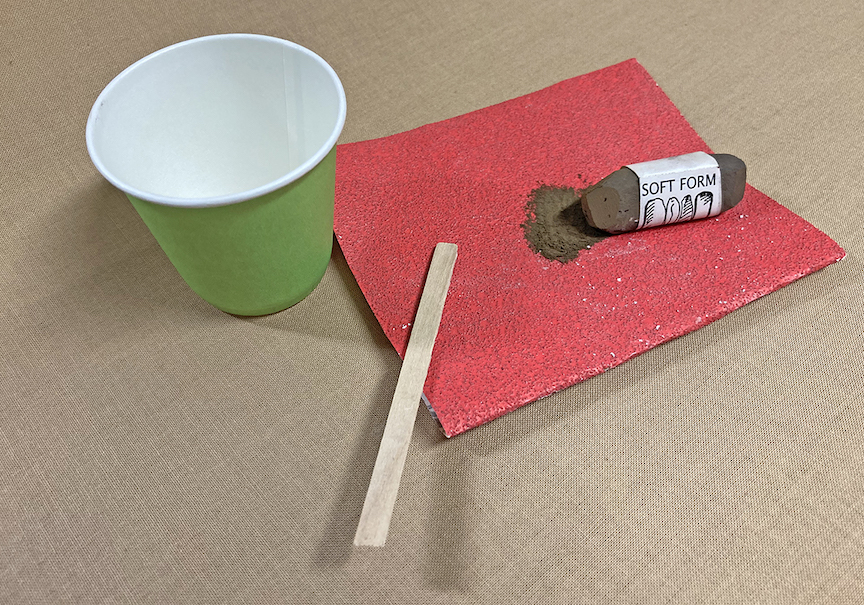
To prepare and “liquify” the pastel for the spattering method, I grind the appropriate pastel colour sticks on very coarse 60 grit sandpaper. Often colours are mixed to create warm and cool complementary greys which approximate the colour of concrete or a particular colour of stone. The pastel “dust” is then poured into a small paper cup. Isopropyl alcohol is added to the pigment with an eye dropper and mixed with a wooden craft stick to create a thin wash. There seems to be enough gum arabic binder remaining in the mixture to permanently adhere the alcohol/ pastel wash to the board.
Using old bristle oil painting brushes or very inexpensive “throw away” stiff bristle brushes found at any craft store, I then carefully apply the mixture in layers on the board. I layer warm and cool greys of similar values, one over another, in the initial application. This creates a foundation for the final desired stone-like effect.
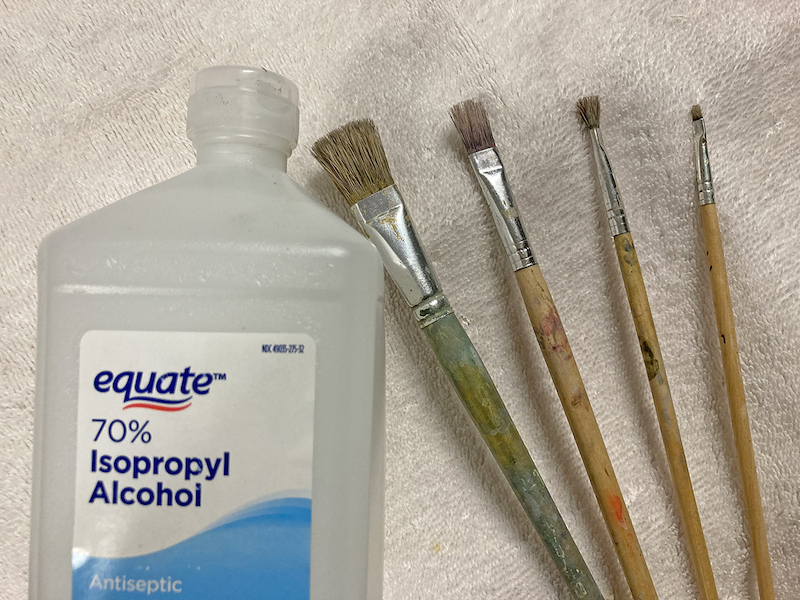
Darker and lighter values and colour are then added to the base layers after a foundation of grey undercolour has been completed.
Brushes of different sizes and the distance a brush is held from the painting surface determine the size of the spatter on the painted area. When larger spattered spots are needed I might use a large brush with longer bristles held further away from the illustration board. If a finer spatter pattern is desired, I use a brush with a much smaller bristle held closer to the artwork.
Pulling back on one small section of the brush’s bristles results in a finer spray of texture on the board. This process is repeated over and over.
Occasionally I’ll dip a sponge into the mix and tap a texture onto the board. Sometimes “happy accidents” occur and a drip or splash of colour which is not in a typical “speckled” shape will land on the board. This will create a bit of variety on larger areas, breaking up the space and adding visual interest to the texture. These splashes can easily be covered up with another layer of spatter or left as is. As many as ten to fifteen very thin layers of liquid pastel, alternating warm and cool, very light to very dark applications of colour, are applied till the correct amount of contrasting values is ready for the next step in the process.

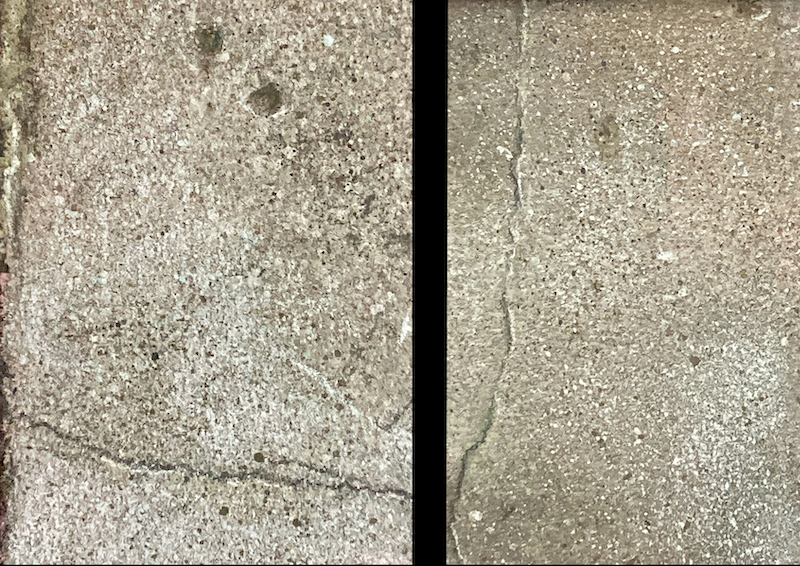
The final stage of rendering a stone texture using my pastel method is working into the spattered area. For me, this is the most enjoyable but also the most tedious part of the entire exercise. This stage of the process could take more time than all the rest depending on just how detailed I would like this texture to be.

The last step in the process requires the ability to look at the painted area and visualize/imagine the non-existent dings, crevices, and organic imperfections in the stone surface. I emphasize what’s there or invent cracks in certain areas of the painting to make the rendered texture believable and as real as possible to the audience. I find it helpful to attempt to “unfocus” my eyes to the degree that certain sections present themselves as places to work into and enhance.
It’s important to be aware of the direction the light is falling on the still life set up to add corresponding dark pitted areas or holes with highlighted edges and cracks consistent with the rest of the other elements in the piece.
Distressing the floral styrofoam by pushing nail holes or dents or dropping the styrofoam on the floor adds dings and wear to achieve the desired end result of a stone-like texture. Doing this before shooting the reference photos creates interest in an otherwise flat field of spattered colour.
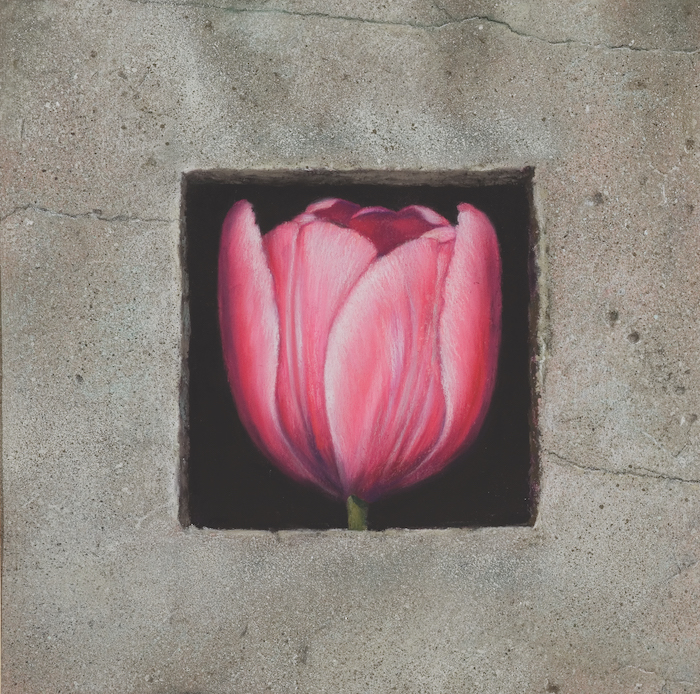
I continue to search for creative ways to add a variety of textures to the rendering process.
Obviously, as with most artistic activities, experience, practise, and a little perseverance experimenting with any medium or technique will eventually yield the desired effect.

*****
Soooooo, are you as impressed by Tim’s ability to create texture, especially stone and concrete texture, as I am?? And, are you going to give it a try? I’d love to know!
If you have questions and responses for Tim, please do leave them as a comment.
Until next time,
~ Gail
PS. Tim Reilly also won the December PleinAir Salon Award for Artist over 65 for “Wanda the Wonder Chicken” (love that piece!) and I wrote about the piece and more on Pastel Today.













11 thoughts on “Tim Reilly – Creating Realistic Stone Textures”
Wow, that was not at all what I expected.
My little brain was trying to figure out Tim Reilly’s technique for realistic texture in concrete before reading and I was totally surprised. His patience and dedication in prep work and planning caught my attention. And the technique for layers of stippling is pure genius. It sure does pay to play with your pastels.
It is also surprising how versatile this fragile medium can be.
Ohhh Melanie I love your takeaways especially the part that says, “It sure does pay to play with your pastels” – yes!!
Thank you so much Gail for featuring this. I’m really excited to give this a go. Many years ago I taught and was commissioned to paint faux finishes like marble, wood grain, sponged, ragged, and stencilled surfaces using acrylic paints and mediums. In the last 3 years I have discovered pastels and en plein air painting. I can’t wait to experiment with these methods in pastel – you’ve expanded my horizons!
That’s so cool Pauline! I’m sure your expertise in painting faux surfaces is going to meld wonderfully with Tim’s techniques. Can’t wait to hear how it goes!
What an interesting article about Tim Reilly fascinating technique. Thank you Tim for sharing it, and thank you Gail for blogging about it.
I love the idea of the painted styrofoam for a reference. I’d like to try the splattering technique next time I paint a wall or a stone. Quite interesting. Great results!!
I know, isn’t that idea cool? Let us know if you try it Ruth!!
I loved the Tim Reilly interview. I am keen to have a go at texturing to create a stoney effect- thank you!
Also found Ai Wei Wei’s sunflower story super interesting- thanks for sharing.
That’s so great to hear Jill!
And glad you enjoyed the Ai Weiwei video.
Yes I found that very interesting. I think it could be applied to boulders and stones as well as concrete. Will definitely try this out. Thanks for your blogs. There is always a gem to glean from them.
Absolutely Anne – I look at rocks and can overlay them with Tim’s technique lol!!
And thanks for your appreciative words 😊